Iodine test

An "iodine test" is a way to monitor the presence of starch during wort production on brew day. Brewers can mix a tiny sample of wort with iodine as a quick and easy way to test for the presence of starch and large dextrins. It is based on the fact that a diluted iodine solution turns from a pale yellow to a darker blue or red color in the presence of gelatinized starch and/or large dextrins, whereas smaller sugars and dextrins do not cause a color change.[1][2] If utilized, this should be performed at the end of the mash and again at the end of the boil. The iodine test is potentially useful for detecting major problems with saccharification, problems with rest durations in a step mash program, or problems with starch pickup during lautering and/or sparging. It's important to understand that the iodine test does not provide a good indication of wort fermentability or extraction—the absence of starch does not mean that the mash is finished.[3]
Be wary! Misinformation abounds on the web because many people do not understand when to utilize the iodine test, how to test properly, or how to interpret the results. Learn the facts before determining whether this is a useful tool to incorporate into your brew day.
Testing materials[edit]
What you need:
- Iodine solution (diluted) plus a storage container
- Dropper
- White testing surface
Iodine[edit]
Iodine solutions containing iodine plus potassium iodide (known as "Lugol's iodine") are available online or at your local drugstore or grocery store with the first aid products. Be sure not to get a substitute that doesn't actually contain iodine. The iodine-based sanitizer Iodophor can be used, but it is not recommended because it produces slower and less clear test results.[4][5]
| Amazon | 2oz 2% iodine solution, includes dropper |
| Adventures in Homebrewing | 1oz 2% iodine tincture, no dropper |
For this test, ideally we need an iodine solution with a concentration around 0.25% (0.02N).[1] As seen above, antiseptic iodine products are much stronger than this, so we need to dilute them. Dilution lightens the iodine's dark color to more of a pale yellow, which makes reading the test results much easier.[6] We can simply mix it with some water or alcohol and it's ready to use. Alcohol (such as ethanol or isopropyl alcohol) may work better for dilution than water (because iodine is more soluble in alcohol), but either one works fine.[4] To dilute a 2% iodine solution to the proper concentration, make a mixture with 1 part iodine and 7 parts diluent (precision is not important, you can use up to 9 parts diluent if you want).
FYI, a diluted iodine solution is not considered hazardous.[7][8] It can be stored at room temperature and it will last a very long time if kept tightly closed.
Testing surface[edit]
A white surface is needed to perform the test so that a color change will be clearly visible. Absorbent substances such as white sidewalk/railroad chalk, drywall, or starch-free filter paper are best for this purpose.[4][6] There are two main benefits of using these surfaces compared to anything else. First, the absorption helps eliminate husk or grit pieces from the sample (which may cause a false reading, see below). Second, this method lets you see test sample with and without the iodine, which helps remove any uncertainty about whether it has changed color. The surface of chalk can be renewed by grinding it on rough pavement. A white plate or bowl can be used instead if other materials are unavailable.[5]
| Menards | White railroad chalk, 6 pack of the finest chalk money can buy. |
Performing the test[edit]
The test is most useful when performed at the end of the mash and then again at the end of the boil.[1][3] The procedure is simple:
- Put 1-2 drops of wort on the testing surface. It's important to use only liquid wort with no bits of grain in it.
- Allow the sample a moment to cool. The test must be performed on a sample at room temperature.
- Add a drop of the iodine solution to the wort sample.
- Watch for a quick color change (within a couple seconds).[9]
Photos by Kai (Braukaiser)
-
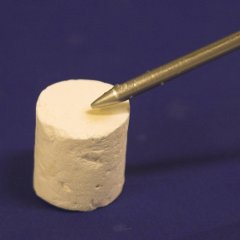
Add wort sample (e.g. using a drip from a thermometer)
-
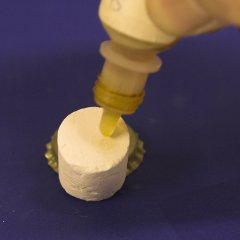
Add iodine
-
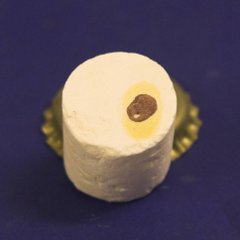
Observe the reaction


When first introducing the iodine test into your brewing process, it may be a good idea to familiarize yourself with it by testing the wort immediately after mash-in and then every 10 minutes or so to observe the progression of the color change.
Interpreting the results[edit]

A color change should be apparent almost immediately. The hue doesn't matter, only that it becomes darker.
Negative result[edit]
If no color shift occurs when the iodine solution is mixed with the wort sample, the test is negative (sometimes called "iodine normal").[1] In most cases, this means that starch and very large dextrins are not present. A negative result helps to rule out some potential problems that could occur during mashing and lautering.
A negative test during the mash does NOT mean that the mash is "finished". The iodine test will be negative much earlier than the point at which mash enzymes will achieve an optimal sugar profile (fermentability) and maximal extraction.[5][10] In other words, the iodine test does not provide any information about wort fermentability or extraction progress. For example, normal iodine level occurs most rapidly when mashing around 169°F (76°C),[3] which would certainly not create a desirable wort due to high amounts of unfermentable sugars. There's a significant range of unfermentable sugars that do not cause a positive iodine test, including unbranched glucose chains from 4 to 10 glucose units in length and a variety of branched dextrins containing up to 60 glucose units.[1][2] FYI, you can monitor the amount of extract during the mash (using a refractometer or hydrometer) for quantitative information about mash progress. The iodine test fills a different role.
There are some instances when a false negative may occur:
- If the sample is too hot, the test does not work because hot starch will not change color in the presence of iodine.[1][4][11][12] The sample wort must be cooled to room temperature before testing. It may be helpful to keep the testing surface (e.g. chalk) in the freezer before testing.
- Some cereal starches contain fatty acids as inclusion compounds.[13] These lipid-starch complexes do not change color with iodine, and therefore some incompletely degraded starch may go undetected.[14][15]
- If the mash temperature is somehow too low for the starch to gelatinize, the wort will not contain starch and therefore not test positive. The iodine test is not useful for detecting this particular mashing issue.
Positive result[edit]
If the color quickly darkens toward black, purple, blue, or red, the test is positive. This generally indicates that starch and/or large dextrins are present in the wort. It's usually bad news to have a positive iodine test at the end of the mash or boil, because it indicates some problem occurred with mashing or lautering. Excluding a false reading, two general problems may cause a positive iodine test at the end of the mash or boil:
- Incomplete saccharification during the mash
- Starch pickup late in the mash with insufficient remaining enzyme activity: Too short or too hot of a late rest in a step mash; poor lautering process; poor sparging process
Incomplete saccharification can be caused by the mash ingredients or by incorrect mashing methods:
- Malt can sometimes contain low levels of enzymes, a phenomenon that can result from poor-quality barley or an improper malting process.
- Dark malts generally contain lower amounts of enzymes, which may be inadequate for full starch conversation. Sometimes a certain percentage of light malt (10–20%) is needed to increase the enzyme capability (diastatic power) of the mash.[3]
- High amounts of adjunct starch (typically from unmalted cereal grain) can overload the enzymes and may lead to incomplete starch degradation.
- Excessively coarse milling may delay starch dissolution, which can delay or prevent full starch degradation.
- "Dough balls" formed during mash-in may delay starch dissolution.
- Too short of a mash may not allow adequate starch degradation (however, appropriate mash length depends on numerous factors, so there's no hard rule about mash duration).
- Mash pH way outside of the recommended range can decrease enzyme function, slowing the rate of starch breakdown and causing a positive iodine test.[3]
- Excessive thermal stress (overheating) during the mash can destroy the enzymes, reducing the rate of starch breakdown or halting it altogether in extreme cases. This is more likely to occur when directly heating the wort such as when using a RIMS or K-RIMS, or when heating the mash tun without recirculation (usually not recommended). It may also occur as a result of a faulty thermometer.
- An excessively thick mash can limit the enzyme activity and lead to slower starch breakdown.
- Additional starch usually gelatinizes at each step during a step mash. This starch requires adequate time and enzyme activity to degrade. Too short of a "dextrin rest" or too hot of a mash-out step can leave residual starch in the wort.
If you see a positive iodine test at the end of the mash, it is advisable to extend the mash time by another 10–30 minutes to potentially give the enzymes more time to more fully break down the starch (do not exceed 2 hours total for the mash). Later, a process review should be conducted to determine any likely causes of the inadequate saccharification. It may be difficult to diagnose exactly what went wrong (and it may be a combination of factors), but all of the problems listed above can usually be avoided by adopting the good brewing practices recommended here at Brewing Forward. For example, one common cause of overheating is a faulty thermometer—make sure your brewing thermometers are calibrated and reading correctly.[3]
Even if the iodine test is negative at the end of the mash, the wort may later test positive. This is why it can be useful to test the wort again at the end of the boil rather than just during the mash. There are several potential causes of starch pickup after the mash:
- Starch granules may be transferred into the boil kettle during lautering (or they can simply pass through the bag if using a BIAB method). These starch granules can gelatinize and dissolve in the wort as it's being heated to a boil.[16][3] Usually, cloudy and solids-rich wort in the kettle is more likely to show a positive iodine test.[3] Consider vorlaufing, switching to a multi-vessel system, or upgrading to a system that recirculates the wort (all of which help increase wort clarity).
- Additional starch can gelatinize and dissolve into the wort if the sparge water is too hot.
If you see a positive iodine test at the end of the boil, the options for degrading the starch are rather limited. The most practical solution would be to add some kind of amylase enzyme product to the fermenter (see Enzymes). Another more complicated option is to add a bit of fresh wort to the fermenter. Only 0.1% volume of wort is required (about an ounce for 5 gallons),[1] and it can be produced with a short low mash in the 60-62°C range. However, this option runs an increased risk of contaminating the beer since the wild microbes on the grain may not be entirely killed with a short low-temperature mash.
Why is "starch" in wort a bad thing? Starch in beer can lead to a slow and incomplete clarification of the beer (resulting from a "starch haze"). This haze is not actually caused by starch itself, but rather by an overabundance of large dextrins. Their solubility is reduced by the alcohol produced during fermentation and the resulting dextrin precipitation causes the haze.[3] A starchy beer may also suffer from sensory defects such as muddled flavor.
There is one instance when a false positive may occur:
- Excessive beta-glucans can also react with iodine, causing a color change and giving a false reading.[2] This effect can be minimized by using the most clear wort possible for the test, straining out any pieces of grain from the sample before adding the iodine, and/or using an absorbent testing surface (recommended above).[4][6][5] Milling too fine can make it more difficult to obtain a clean sample.
As we can see, an iodine test performed after mashing and again after boiling is a quick and easy way to detect incomplete starch degradation and starch pickup. Therefore this test can serve as a safeguard against potential problems on brew day. Iodine testing can be especially useful for new brewers that are still learning good techniques, or even for more experienced brewers that step mash, use lots of adjunct starch, sparge, or use a BIAB lautering method. Although it is not commonly utilized by home brewers, there's a good basis for why iodine testing is recommended by authors of professional brewing textbooks.
Chemistry[edit]

Iodine (I2) is poorly soluble in water because it is non-polar. Potassium iodide (KI) on the other hand rapidly dissociates to K+ + I- in water. The iodide ion (I-) from KI bonds with the molecular iodine (I2) to form a triiodide ion (I3-). Therefore adding KI at about twice the mass of molecular iodine helps dissolve the iodine, bringing it into solution.[4]
Glucose chains that are sufficiently long coil up like springs (called a helix). This helix is supported by weak links between the glucose molecules. When the chains are longer than about 9 glucose molecules a triiodide ion (I3-) fits inside the helix to form a chemical entity called a clathrate.[12] The resulting iodine-dextrin molecule absorbs light, which is the cause of the typical color reaction between iodine and starch. The longer the glucose chains are the more iodine molecules fit into the coils and the more intense the color reaction will be.[4][17] The transfer of charge between the starch and the iodide ion changes the spacing between the energy levels/ orbitals. This change results in the starch-iodide complex absorbing light at a different wavelength, resulting in an intense purple color.[18]
The helical structure breaks down at high temperatures and the glucose chains uncoil, which is why the iodine test only works with cold wort samples.[4]
See also[edit]
References[edit]
- ↑ a b c d e f g Kunze W, Hendel O, eds. Technology Brewing & Malting. 6th ed. VLB Berlin; 2019:222–223.
- ↑ a b c Fix G. Principles of Brewing Science. 2nd ed. Brewers Publications; 1999.
- ↑ a b c d e f g h i Narziss L, Back W, Gastl M, Zarnkow M. Abriss der Bierbrauerei. 8th ed. Weinheim, Germany: Wiley-VCH Verlag GmbH & Co. KGaA; 2017.
- ↑ a b c d e f g h Troester K. Iodine test. German brewing and more website. Modified 2011. Accessed 2020.
- ↑ a b c d Goldman J. On the road to conversion. Craft Beer & Brewing website. March 2016. Accessed December 2020.
- ↑ a b c Carr N. How to do an iodine mash conversion test. Kegerator.com website. June 2020. Accessed December 2020.
- ↑ Iodine solution 0.02N safety data sheet. ThermoFisher Scientific. Revised January 2018. Accessed December 2020.
- ↑ Higdon J, Drake VJ, Delage B, Pearce EN. Iodine. Oregon State University website. Revised 2015. Accessed December 2020.
- ↑ Heit B. Brew Science: The iodine test. Sui Generis Brewing website. September 2012. Accessed December 2020.
- ↑ Troester K. Conversion progress in a single infusion mash. Braukaiser website. March 2011. Accessed December 2020.
- ↑ Iodine–starch test Wikipedia website. Revised November 2020. Accessed December 2020.
- ↑ a b Lewis MJ, Young TW. Brewing. Springer; 2001:234.
- ↑ Langenaeken NA, De Schepper CF, De Schutter DP, Courtin CM. Different gelatinization characteristics of small and large barley starch granules impact their enzymatic hydrolysis and sugar production during mashing. Food Chem. 2019;295:138–146.
- ↑ Briggs DE, Boulton CA, Brookes PA, Stevens R. Brewing Science and Practice. Woodhead Publishing Limited and CRC Press LLC; 2004.
- ↑ Golston AM. The impact of barley lipids on the brewing process and final beer quality: A mini-review. Tech Q Master Brew Assoc Am. 2021;58(1):43–51.
- ↑ Krottenthaler M, Back W, Zarnkow M. Wort production. In: Esslinger HM, ed. Handbook of Brewing: Processes, Technology, Markets. Weinheim, Germany: Wiley-VCH Verlag GmbH & Co. KGaA; 2009.
- ↑ Ophardt CE. Starch - Iodine. Elmhurst College Virtual Chembook. 2003. Accessed 2020.
- ↑ What is the iodine test for starch? Brilliant Biology Student website. 2015. Accessed December 2020.