RO systems

A home RO water system is a convenient way to obtain pure water that can be adjusted to serve as the basis for any style of beer or wine. Reverse osmosis (RO) purification involves forcing water through a membrane using pressure, which removes minerals and other impurities.[1] The pressure required for this process is usually applied via municipal water pressure or sometimes with a pump. RO is a type of crossflow filtration, having two output streams: one with the purified water and one that carries away the waste water containing a high concentration of minerals.[2] A good system typically removes at least 95% of the dissolved solids, and in some cases up to 100%.[3][4][5][6] However, as little as 20% of the feed water may be captured as filtered water (i.e. for every 1 gallon collected, 4 gallons go down the drain), and this can be a concern in areas where water availability is limited and/or water disposal is problematic.[2][5][7]
Terminology:
- Permeate - The purified water that passes through the RO membrane.
- Concentrate - The waste water that does not pass through the RO membrane. It contains relatively higher amounts of dissolved solids (e.g. salts).
- Recovery rate - The percentage of permeate collected from the water entering the system.
- Rejection rate - The percentage of dissolved solids removed by the filter.
- Total dissolved solids (TDS) - The mineral content of the water, expressed as parts per million (ppm, which is effectively the same as mg/L).

Quality RO systems[edit]
Surprisingly, very few home RO systems feature quality components and intelligent design. Here are the only systems (in the US) that meet our recommended criteria:
| Product | Stages | Notable Features |
|---|---|---|
Buckeye Hydro Premium RO System |
|
Includes:
Options:
|
| SpectraPure Eliminator Hydroponic RO System |
|
Includes:
|
| SpectraPure CSP RO System |
|
Includes:
|
Summary of the selection criteria:
- Correct filter sequence
- Quality pre-filters
- Sediment and carbon block pores 1 micron or less
- No GAC and no "combination" (sediment + carbon together) pre-filters
- Thin film composite RO membrane (e.g. FilmTec®), low flux preferred
- No unnecessary stages like multiple carbon blocks, DI resin, or a remineralization stage (e.g. alkalinity)
- Flush valve (optional, recommended)
- Pressure gauge (optional, recommended)
- Clear standard housings (optional, recommended)
Keep in mind you can easily upgrade the pre-filters, so if you have limited options (international shoppers, perhaps), don't let poor-quality filters stop you from buying an otherwise high-quality system. Also be aware that components like a flush valve and pressure gauge can be added if needed.
Instead of buying an assembled RO system, another option is to build it yourself. Many of the vendors that sell RO systems also sell all of the individual parts. You could potentially save money this way.
If you are looking for a high-flux system (at least 500 gpd), see High-flux RO systems.
System components[edit]
Filters[edit]
A typical RO system treating chlorinated water contains a default configuration of 3 stages:[8][9]
- Sediment filter
- Carbon block filter
- RO membrane
Sediment pre-filters[edit]
These are designed to remove particulates from the water, including bacteria, clay, colloidal silica, and iron corrosion products (rust). Removal of sediment prolongs the life of other filters, and therefore it should always be the first stage of filtration.[10][11][12][13] Sediment filters come in a variety of pore sizes rated in microns. The smaller the pore size, the more effective they are at removing particulates. Pore size of 5 micron or smaller is recommended.[2][6] Smaller pores such as 1–3 micron will help prevent silica fouling of the RO membrane. Filters having multiple layers with different pore sizes are most efficient and have a longer life. The pore size on the sediment filter should be about equal to, or smaller than the carbon block pore size.
Both city water and well water contain sediment, so a sediment filter is needed in all cases.[14][15][16]
Summary of the ideal sediment filter:
- Pore size no larger than 5 microns
- Pore size about the same as the carbon block(s) or smaller
- Positioned as the first stage in the RO system
Carbon pre-filters[edit]
Activated carbon removes many unwanted compounds from the water, but most importantly it removes the chlorine that would otherwise harm the RO membrane.[2][17] Three forms of activated carbon filters are seen in water filtration systems: granulated activated carbon (GAC), carbon block, and catalytic carbon.[10]
GAC should be avoided as a pre-filter. A carbon block will typically offer much better performance at only very marginally increased cost.[18][8][10][19][20][21]
Every RO system should contain a carbon block. Pore size typically ranges from 0.5 to 10 microns. Smaller pores remove chlorine and other compounds more effectively and provide greater protection to the RO membrane, with 0.5 micron being the most superior by far.[11][22] Carbon blocks are also sometimes rated by the volume of water that can pass through before they need to be replaced.[18] This can range from a few hundred gallons up to 20,000 gallons. Be wary if the filter doesn't specify this! Carbon blocks are not very effective at removing chloramine, especially filters with pores larger than 0.5 micron.
Many RO systems on the market contain multiple larger-pore carbon pre-filters +/- post-filters. They intend to trick you into thinking that the extra stages are better, but really they just want to sell you a more expensive system and more replacement filters. Just one quality (small-pore) carbon block is needed. Surface area of the carbon block increases exponentially with smaller pore size, so for example, in theory it would take one hundred 5 micron carbon filters to provide the same performance as a single 0.5 micron carbon filter!!
Catalytic carbon is an advanced activated-carbon product designed to remove chloramines. If there are chloramines in your water, a catalytic carbon filter stage must be used because chloramines will damage the RO membrane and potentially cause off-flavors in your brew (see Chlorine removal).[6][8] Catalytic carbon also removes hydrogen sulfide gas, which produces the "rotten egg" smell in some well water and can impair RO membrane performance.[10][23][24]
Summary of the ideal carbon pre-filter:
- Positioned between the sediment filter and RO membrane
- Only one carbon block pre-filter, and not GAC
- Smallest pore size is best, 0.5 or 1 micron
- A catalytic carbon stage is needed if your water has chloramines or hydrogen sulfide
RO membrane[edit]

The RO membrane removes dissolved minerals and other contaminants from the water.[11] There are two types of RO membranes: thin film composite (TFC) and cellulose triacetate (CTA). TFC is preferred because it has a higher rejection rate and longer lifespan.[25][26][27] FilmTec™ membranes for example are among the most reliable and consistent TFC elements in the industry.[28] Be wary when purchasing a system if it doesn't specify what type of membrane is included.
Home RO membranes have different production flow (flux) ratings that indicate how quickly purified water is produced, typically ranging from 24 to 100 gallons per day (gpd). Lower flux membranes have the advantages of a higher rejection rate AND improved carbon filter effectiveness due to longer contact time. Therefore, it's best to choose the lowest flux membrane that can keep up with demand. Be aware that the actual performance of your system won't exactly match the manufacturer flux rating because your system will have different operating conditions from factory specification.[2][28]
The RO membrane cartridge has a small outflow orifice (flow restrictor) to limit the waste flow and create a high pressure on the membrane.[5] This component is paired with the particular membrane flux, so if you decide to switch to a different RO membrane flux at some point, the flow restrictor will also need to be changed.
Summary of the ideal RO membrane:
- FilmTec™ or other TFC membrane
- Lower flux is preferred (i.e. 24-50 gpd)
Deionization (DI) stage[edit]
A DI stage contains an ion exchange resin; it can be used to remove minerals that the RO membrane failed to reject. Systems with this stage are called "RODI". Very few people use a RODI system for brewing water because popular opinion is that it's generally not worth the added expense and maintenance. A low amount of dissolved minerals remaining from a functional RO system will have no significant impact on the brewing process.[8][29]
Carbon post-filter[edit]
A carbon post-filter is often suggested to help to improve the taste of drinking water.[8][30] However, a high-quality carbon block pre-filter combined with a low-flux RO membrane along with proper maintenance should allow the system to effectively remove basically all of the offensive volatile organic compounds. Therefore a carbon post-filter will be generally unnecessary on a quality system, even for drinking water. However, in-line GAC post-filters can easily be added or removed based on your particular water and RO system performance. GAC is acceptable as a post-filter (vs carbon block) because high performance isn't needed at this stage, and also the contact time in a post-filter is significantly longer compared to a pre-filter, which increases the effectiveness.
Filter housings[edit]
There are two different types of filter housings on home RO systems:
- Standard housings
- Single-use housings (typically called "in-line" filters)
Standard housings (present on our recommended systems) are designed to hold standard-sized filters (2.5" x 10"), which means that you can shop anywhere for replacement filters and you have many different options. Standard housings may be clear or opaque.
Single-use housings (e.g. APEC Countertop system - Amazon) are another gimmick designed to increase price (and brand loyalty) with no added value for the customer. They're arguably no more convenient than standard pre-filters and yet you will pay much more money for replacement filters and have fewer options for specifications. Even with disposable housings, the system still needs to be cleaned periodically.
Pressure gauge[edit]
A pressure gauge can be used to read the water pressure in the system after the pre-filters and before the RO membrane (any other positioning is inappropriate).[31] This provides some very useful information:
- It will tell you whether your home's water pressure is sufficient.
- Decreasing pressure indicates that one or more of the pre-filters are clogged and need to be replaced.[2][11][25] (see maintenance below)
- Increasing pressure may indicate excessive microbial growth on the RO membrane (biofouling).
A pressure gauge can still be installed even if you already purchased a system without one.
TDS meter[edit]
A Total Dissolved Solids meter (which actually measures water conductivity and estimates TDS) is an essential tool for monitoring RO membrane performance. Some systems offer inline TDS monitoring for convenience, but using a handheld meter is probably a better option. See TDS testing for meter recommendations and testing instructions; they are fairly inexpensive and easy to use.
-

SpectaPure CSP with inline TDS meter, pressure gauge, and flush valve. Photo by ScrewyBrewer on HBT.

Flush valve[edit]
A flush valve temporarily allows a higher flow of water through the system to flush minerals and organic contaminants (including microbes) away from the RO membrane. Periodic flushing significantly increases the longevity of the RO membrane and can improve system performance (see the maintenance section below). The RO membrane is the most expensive component of the system and therefore a manual or automatic flush valve is a good option to reduce operational cost. A flush valve can still be installed even if you already purchased a system without one.
A flush valve is an optional component since an RO system will function adequately without it. In fact, most home RO systems on the market do not have a flush valve. The sellers obviously prefer that you buy expensive replacement RO membranes more frequently rather than perform preventative maintenance to extend the membrane life.
Manual: As the name implies, a manual flush valve must be opened and closed by hand whenever you need to flush the system. It's easy—just turn the valve 90°, but you need to remember to use it.
Automatic: An automatic flush control system fully automates the flushing process. Depending on the product, it can flush the membrane for a short period at start-up, every hour during operation, and at shut-down.[25] Keep in mind this device requires power to operate, unlike the rest of a basic RO system.
Pumps[edit]
There are two different kinds of pumps that may be used in an RO system, each for a different purpose.
Booster pump: If your water line pressure is too low for the system to operate efficiently (i.e. under 40psi), then a "booster pump" should be used to increase the water pressure on the RO membrane. It should be added between the carbon block and the RO membrane, rather than before the entire system.[31] Also see the Optimization section below. A "low pressure switch" is a nice add-on when using a pump since it will shut it off when water is not available, preventing damage to the pump. A "high pressure switch" is to turn off the pump when the pressurized tank is full.
Permeate pump: If you are using a pressurized storage tank, a permeate pump is highly recommended. This device helps pump the permeate into the tank and will dramatically improve system performance. It does not require electricity to operate since it utilizes the hydraulic power from the waste water.
Collection accessories and storage tanks[edit]
There are 3 basic water collection options for brewers:
- Open vessel
- Open vessel with float valve
- Pressurized storage tank
Collection in an open (unpressurized) vessel simply requires placing the end of the permeate tubing into whatever vessel you want to fill with water, such as plastic water jugs. You will need to manually turn off water flow to the RO system when the vessel is full. The obvious major downside to this method is that the vessel will overflow if it runs for too long. A simple solution to avoid problems in that case is to place the collection vessel in a sink, in a tub, on the ground near a drain, or outside (weather permitting). Once you know the production speed of your system, you can set a timer to remind you to turn off the system when the vessel is full.
If you prefer to have the system shut-off automatically when the vessel is full, you can use a dedicated vessel with a float valve installed. The float valve will shut off the permeate flow when the water fills to the level set by the valve (similar to how a toilet tank works). In this setup, an automatic shut off valve (ASOV) is also needed to shut off the flow of water from the feed water supply line; otherwise water would continue to flow down the drain after filling stops.[11][25] Additionally, a check valve is needed to prevent backflow through the RO membrane.[32] Keep in mind that tanks and plumbing in contact with the filtered water should be plastic (or lined with plastic) because the purified water is corrosive to metal.[5][33] If metal must be used for the collection vessel, stainless steel is preferred.[34]
The third option is to store the water in a pressurized storage tank, which is designed to dispense water quickly on demand and then refill automatically. This type of tank contains an air bladder to increase pressure as the tank fills with water. Driven by this pressure, the tank can dispense water to a dedicated faucet, or even plumbed directly into an automated brewing system. Be aware that the actual capacity of a tank is less than what the manufacturer indicates because of the air bladder. For example, a 4.5 gallon tank will actually hold around 2.5-3 gallons of water. Furthermore, the exact amount of water the tank is capable of holding will differ based on the feed pressure and the settings on the shutoff valve.[35] A 14 gallon pressure tank is appropriate if you want to store 6 to 8 gallons of RO water.[31] As mentioned above, a permeate pump is highly recommended because the back-pressure from the pressurized tank will significantly deteriorate every aspect of system performance: decreased rejection rate, decreased recovery rate, slower production speed.[8]
-
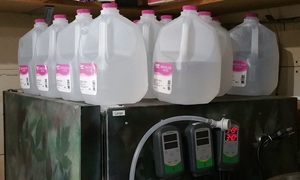
Water jugs refilled with RO water. Photo by mongoose33 on HBT
-
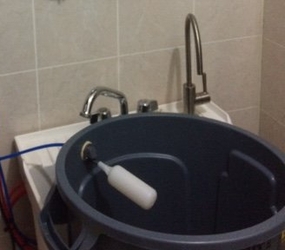
Float valve installed in a plastic collection vessel. Photo by ITV on HBT


Installation[edit]
Here we have a few tips for installation. First, don't install or leave the system anywhere with direct sunlight. It may overheat or encourage algae growth (particularly in systems with clear housings).[17]
Connecting to the source water[edit]
- The easiest way to feed water into the system is to connect it to a garden hose spigot (bibb) in your home (e.g. in a utility sink or laundry area) or even outside temporarily.
- A similar option is to use a faucet adapter to connect it to a sink faucet, although be aware that many modern sink faucets will not accept common adapters.
- Another relatively easy option is to use an adapter to connect to the under-sink shut-off valve.
- Lastly, the system can be attached directly to a water line in your home if you have some plumbing knowledge.
-
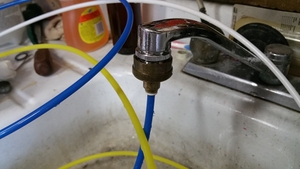
Sink faucet adapter. Photo by mongoose33 on HBT

Softened water[edit]
If you have a water softener, it's best to install the RO system after the softener. In other words, feed the softened water into the RO system. This improves the RO system performance by avoiding mineral scale on the membrane.[31][36]
Drainage[edit]
The concentrate water needs somewhere to drain. One option is to simply place the waste water tubing in a sink or any other drain. Be careful that the tubing doesn't move away when the pressure changes during flushing.
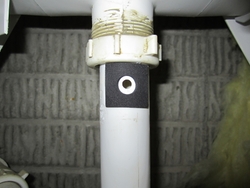
A more permanent solution is to use a "drain saddle". This simple device secures the concentrate tubing to a drain pipe below a sink, in which you have drilled a 1/4" hole.[32] The following photos (by Dr. Adam Bittner) show installation of the drain saddle included with a Buckeye Hydro RO system.
-
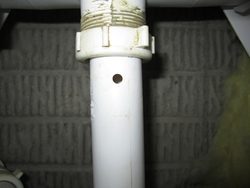
Drill a hole in the pipe
-
Apply the adhesive gasket
-
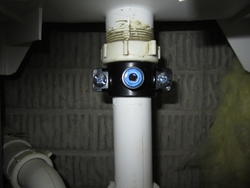
Attach the saddle
-
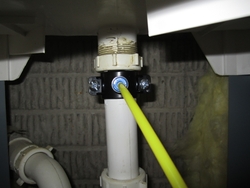
Push in the tubing


Initial setup process[edit]
General first time setup:
- Make sure your hands and work area are clean. Avoid touching the RO membrane and other filters unnecessarily.
- Connect all tubing correctly. Consider testing system performance before attaching the concentrate tubing to anything (see below).
- Flush the carbon filter(s) for 10 minutes.
- The RO membrane should not yet be installed during this step.
- It is normal for carbon filters (especially GAC) to release some black grit during the first flush.
- Check for leaks.
- Install the RO membrane.
- Allow the system to run for about 60 minutes or produce 2 gallons of permeate, whichever takes longer.[17]
- To remove any air bubbles, hold the RO membrane housing vertically with the outflow upward for around 10-15 seconds and give it a few taps. Repeat if needed (vibration or noise).
- The initial water must be discarded.
- Check for leaks again.
If the pressure gauge isn't working, a simple solution is to loosen (unscrew) it a little bit. Sometimes an overly-tightened gauge can cause the gasket to cover the hole, interfering with the gauge operation. Alternately, the gasket can be removed; just be sure to use a little plumbers tape when re-installing the gauge.
Optimization[edit]
Optimizing your system can potentially lead to better purification, less waste water, and faster production speed. Measuring system performance is needed to determine what interventions may be helpful. There are 3 useful metrics: Pressure on the RO membrane, rejection rate, and recovery rate
Pressure[edit]

Measuring the pressure requires a pressure gauge. A gauge can be added if your system doesn't have one included. Example: Pressure gauge from Buckeye Hydro
RO systems operate best with at least 40-50 psi. With increasing effective feed pressure, the permeate TDS will decrease while the recovery rate will increase.[2] Around 80 psi is a reasonable maximum and will provide exceptional performance.[11][17] However, keeping the pressure at the right level to produce the rated permeate flow will maximize the life of RO membrane.[36]
If your line (plumbing) pressure exceeds 80 psi, you should install a pressure regulator to reduce the pressure. Example: Pressure regulator from Buckeye Hydro. If your feed water is coming from a faucet, a temporary solution is to regulate the pressure using the faucet handle. Be careful not to open the faucet too far.
If you need/want to increase your line pressure, you can install a booster pump between the pre-filters and RO membrane. Example: Aquatec 8800 booster pump from Buckeye Hydro. If your water comes from a municipal source, another option is to increase the water pressure for the whole house. This is controlled by a pressure regulator on the water line coming into your house, which is simple to adjust.[37][38] Be wary that excessively high pressure on the entire house can put extra strain on plumbing—consult a professional.
Rejection and recovery rates[edit]
Rejection rate is easy to measure. Test the TDS of the source water and the permeate under normal usage conditions. If the rejection rate isn't at least 90-95%, you should perhaps try to re-seat the RO membrane to make sure it isn't leaking; consider also using a food-grade lubricant on the seals.
Rejection rate = 1 – (Permeate TDS ÷ Source TDS)
Measuring recovery rate is a little more involved. A simple way to measure the output volumes is to line up 6 to 8 identical cups (e.g. Solo cups) in front of your RO system outputs. You may use more precise measuring equipment if you have it available. Make sure the automatic flush system is turned off during the test if your system has one.
- Systems without a pressurized tank: With your concentrate tube in one hand, and your permeate tube in the other, determine how many cups are filled with concentrate in the time it takes to fill one with permeate.
- Systems with a pressurized tank: Measure the concentrate output in the cups starting from when you begin dispensing one cup of permeate from the tank. Measure the waste water until it is done flowing (i.e. until the tank has been refilled).
If more than 4 cups of concentrate are produced for one cup of permeate, then a tighter flow restrictor would be beneficial. The flow restrictor is inexpensive and easy to replace in most systems.[39] Increasing the recovery rate doesn't improve membrane flux or salt rejection; it only reduces the amount of water wasted. For systems with pressurized tanks, a permeate pump would significantly improve the recovery rate, production rate, and rejection rate. Example: Aquatec permeate pump
Other factors like water temperature and source water TDS can also affect performance, but aren't so easy to control.[2] For example, water temperature is one of the most important factors affecting performance.[8] Colder water and/or lower water pressure will result in slower production and lower recovery rate. Buckeye Hydro has a calculator to help predict the effects of various water temperature and pressure combinations. If your source water has very high TDS (lots of calcium in particular), a water softener may be something to consider to help improve performance and prolong the life of the RO membrane.[40]
Maintenance[edit]
Regular maintenance will lower the operation cost, extend the life of the system, and ensure production of high-quality water.
Summary:
- Monitor membrane pressure, TDS, and possibly chlorine
- Replace filters as needed
- Check for cracks and leaks
- Flush system frequently
- Clean and sanitize periodically
Replacing filters[edit]
Replacing pre-filters regularly is necessary to protect the more expensive RO membrane. With with exception of systems with single-use housings, nearly all residential RO systems are designed to utilize 2.5" x 10" filters.[11] Whenever replacing filters, always check for cracks in the housings and check for leaks. It may be wise to also clean the system and lubricate the gaskets when changing the filters.
Sediment filters should generally be replaced every 6 months. However, the actual lifespan will vary depending on the source water quality and how often the system is used. A pressure gauge after the pre-filters helps to more precisely determine when to replace them, rather than guessing. A 15–20% drop in pressure indicates that they need to be replaced.[17][6][11] You can remove just the sediment filter and check pressure to see which pre-filter(s) are clogged. If the system has a "booster pump", it needs to be turned off in order to appropriately measure the pressure differential.
For best results, the carbon block should be replaced after it has filtered 50% of the stated chlorine-removal capacity, and at least every 6-12 months.[6][11][31] Chlorine testing strips can be useful for monitoring chlorine removal (run the system for 30 minutes and then test the water coming from the pre-filters, before the RO membrane).[41][42][17] The filter should be replaced if the level of chlorine is above zero. New carbon filters must be flushed with water for at least 10 minutes before use. Don’t run the flush water through other stages in your system—this is especially important if you are using GAC (including catalytic carbon).[11]
LaMotte chlorine test strips (free and total chlorine) - Bulk Reef Supply
The RO membrane is the most expensive part of the system. It must be replaced when the rejection rate begins to decrease, which usually corresponds to an increased TDS. For monitoring, a TDS meter should be used to compare the permeate TDS to the source water TDS.[31] Allow the system to run for several minutes before checking. See TDS testing. Be aware that membranes commonly produce purified water more slowly as their function declines.[11] Also be aware that the TDS of the permeate tells you nothing about the condition of your pre-filters or when to change them.[8] If the system is well-maintained and the pre-filters are consistently replaced on time, the RO membrane should last several years.[2][6] New RO membranes must be flushed for at least 60 minutes to remove preservatives before using the product water. Don’t run flush water through other stages in your system.
If your system has a DI stage (not recommended), it may have a visual color-change indicator to help determine when it needs to be replaced. However, the color indicator is not particularly accurate, so it is recommended to monitor TDS before and after the DI resin as well as the source water to make sure that the RO membrane is also functioning well.[11] A poorly functioning RO membrane will quickly expend the DI resin.
Flushing[edit]

Every RO system is under constant threat of excessive microbial growth and/or mineral concentrate forming a biofilm or mineral scale respectively.[43] Both of these can result in significantly decreased system performance (i.e. "fouling" of the membrane) and decreased life of the RO membrane.
The simplest way to prevent RO membrane fouling (thereby significantly prolonging the lifespan of the RO membrane) is by regular use of a flush valve.[44][45][46][47][48][49][50] Ideally it should be at least flushed every day, but at least once every 1–2 weeks may be acceptable in home systems.[51][8][52][53] It should be flushed for around 15–30 seconds periodically during use and immediately after each use (ideally until concentrate TDS matches feed water TDS). Short flushing intervals are more effective than long flushing times—flushing for 30 seconds every 30 minutes is better than flushing for 60 seconds every 60 minutes.[2] Note that flushing can cause a small spike in TDS of the permeate if it continues to flow (depending on your water pressure). It's best for the flush water to also bypass the DI stage, if present.
Cleaning and sanitation[edit]
Along with regular use or flushing of the system to avoid stagnant water, it's generally recommended to wash and sanitize the entire system at least once per year.[5][8][31][52][54][55] Cleaning may also be considered when the the system shows decreased flux or decreased rejection rate, rather than simply replacing the RO membrane.[56] Sanitation alone is not effective; the system must first be cleaned.[43]
As a home brewer, hopefully you are no stranger to thorough cleaning methods. Same as with other equipment, the best method for cleaning RO systems is a two-stage approach:[2][57]
- Sodium hydroxide (NaOH) 0.1% long soak (e.g. overnight). Use warm water. Flush/rinse afterward with RO permeate.
- Citric acid 2% short soak (e.g. 60 minutes, longer is OK). Flush/rinse afterward with RO permeate.
The easiest way to accomplish the cleaning process may be to disassemble the system and soak it in a bucket.
After cleaning, sanitizing may be performed:
- Option 1: Soak in hydrogen peroxide (H2O2) diluted with RO permeate to 0.2% at a temperature below 77°F (25°C) for 20 minutes. A pH of 3–4 gives optimal efficacy and longer membrane lifetime.[2] See pH testing.
- Option 2: Make 1% sodium or potassium metabisulfite plus 1% citric acid and soak for at least an hour. This option may be less effective, but it also has less risk of damaging the RO membrane.
FilmTec™ RO membranes can operate over a pH range of 2–11 and are suitable for temperatures up to 113°F (45°C).[2] Other brands should have similar tolerances, but you should refer to the manufacturer specifications in order to avoid damage during cleaning.[17]
Because it will cause permanent RO membrane damage, bleach is not recommended for sanitizing RO systems while the membrane is present.[2][36] Other oxidizing agents such as hydrogen peroxide (including percarbonate-based cleansers such as Oxiclean and PBW), iodine (e.g. Iodophor), chlorine dioxide, and permanganate are also capable of damaging RO membranes if not used properly. On the other hand, Sani-System commercial sanitizer does not harm the RO membrane. However it is not recommended to use with the RO membrane present because it does not pass through it very well, and therefore it may have trouble sanitizing components on the permeate side.
FYI: Other websites recommend using bleach to sanitize the system after removing the RO membrane. It's clear that this approach fails to sanitize the most important part of the system, the RO membrane, which is also the most susceptible to accumulating microbial growth. Therefore, unless you are replacing the RO membrane at the time of cleaning, you should use cleaning and sanitation chemicals that will help maintain the existing RO membrane (i.e. NOT bleach).
Storage[edit]
Be aware that when the system is turned off and disconnected from the source water, a temporary permeate reverse flow can occur by natural osmosis, causing suck-back.[2]
When the system is not used for longer than 48 hours, take care that:[2]
- The RO element does not dry out. A dry element will irreversibly lose flux.
- The system is adequately protected against microbiological growth (see below), or regular flushing is carried out.
- The system is protected against temperature extremes.
- When the system is turned back on after a long period, run it for at least 30 minutes and discard the water.
Any used RO membrane must be properly prepared for long-term storage or shipping:[2]
- Make a storage solution of 1–1.5% food-grade sodium metabisulfite in good-quality water (e.g. RO permeate).
- Use sanitized pliers to remove the RO membrane from the housing
- Soak the membrane for 1 hour in the solution; keep it in a vertical position so that the entrapped air can escape. Allow it to drip out, and seal it into an oxygen barrier plastic bag; such bags are available from DuPont. Do not fill the plastic bag with the preservation solution—the moisture in the membrane is sufficient, and leaking bags might create a problem during transport or storage.
- The temperature should not exceed 95°F (35°C) or drop below freezing.
- The membrane should be visually inspected for biological growth every three months, and the pH of the solution must be checked. If the preservation solution appears cloudy, the membrane should be re-preserved and repacked as above. Re-preservation is also mandatory when the pH drops to 3 or lower.
It's generally best to clean the membranes prior to preservation. After cleaning, the preservation should follow within the next 10 hours.[2]
See also[edit]
External links:
- Buckeye Hydro FAQ answers some commonly asked questions
References[edit]
- ↑ Reverse osmosis (RO). DuPont website. Accessed October 2020.
- ↑ a b c d e f g h i j k l m n o p q r FilmTec™ reverse osmosis membranes technical manual. Dupont website. Updated April 2020. Accessed October 2020.
- ↑ Kunze W. Hendel O, ed. Technology Brewing & Malting. 6th ed. VBL Berlin; 2019.
- ↑ Taylor DG. Water. In: Stewart GG, Russell I, Anstruther A, eds. Handbook of Brewing. 3rd ed. CRC Press; 2017.
- ↑ a b c d e Palmer J, Kaminski C. Water: A Comprehensive Guide for Brewers. Brewers Publications; 2013.
- ↑ a b c d e f Reverse osmosis guide. HomeBrewTalk website. 2012. Accessed October 2020.
- ↑ Eumann M, Schaeberle C. Water. In: Bamforth CW, ed. Brewing Materials and Processes: A Practical Approach to Beer Excellence. Academic Press; 2016.
- ↑ a b c d e f g h i j Guide to reverse osmosis systems for homebrewers. HomeBrewTalk website. 2018–2019. Accessed October 2020.
- ↑ Reverse osmosis membranes explained. WaterProfessionals website. Accessed October 2020.
- ↑ a b c d Scherer T, Johnson R. Filtration: sediment, activated carbon and mixed media. North Dakota State University website. November 2015. Accessed October 2020.
- ↑ a b c d e f g h i j k l FAQ. Buckeye Hydro website. Accessed October 2020.
- ↑ Most common water filter and water treatment questions. WaterFilters.net website. Accessed October 2020.
- ↑ Sediment filtration vs carbon filters. Metro Water Filter of the South website. Accessed October 2020.
- ↑ Diehl C. Understanding different water contaminations in Maryland. National Water Service website. 2020. Accessed November 2020.
- ↑ What is water heater sediment? Apollo drain.com website. Accessed November 2020.
- ↑ Bianchina P. Improving Your Home: Periodic flushing helps water heater health. The Oklahoman website. 2014. Accessed November 2020.
- ↑ a b c d e f g Eliminator RO™ reverse osmosis water purification system. SpectraPure® Inc. September 2019. Accessed October 2020.
- ↑ a b Carbon block filter buyer's guide. Carbon Block Technology website. Accessed October 2020.
- ↑ Granular activated carbon filters vs carbon block filters. Water Filter Shop website. September 2016. Accessed October 2020.
- ↑ Carbon block water filters vs granulated active carbon water filters - which is better? Epic Water Filters website. December 2018. Accessed October 2020.
- ↑ The difference between granular activated carbon and activated carbon block water filters. Rajah Filter Technics website. Updated April 2018. Accessed October 2020.
- ↑ 0.5 micron carbon block filter 10". SpectraPure website. Accessed October 2020.
- ↑ Water chemistry and pretreatment: treatment of feedwater containing hydrogen sulfide. Dow Tech Manual excerpt. Accessed October 2020.
- ↑ Boyle N, Ghiu S, Levitus N. The use of catalytic GAC for removal of hydrogen sulfide in groundwater. Hazen and Sawyer website. May 2016. Accessed October 2020.
- ↑ a b c d Pure brewing water using reverse osmosis. The Screwy Brewer website. July 2014. Accessed October 2020.
- ↑ Buying guide: reverse osmosis systems. Advanced Water Filters website. Accessed October 2020.
- ↑ Sagle A, Freeman B. Fundamentals of membranes for water treatment. The future of desalination in Texas. 2004;2(363):137.
- ↑ a b Dow FilmTec home RO membrane elements. Applied Membranes Inc. website. Accessed September 2020.
- ↑ My RO system. HomeBrewTalk website. 2019. Accessed October 2020.
- ↑ Woodard J. Stages of reverse osmosis systems. Fresh Water Systems website. October 2017. Accessed October 2020.
- ↑ a b c d e f g Reverse osmosis filtration system. HomeBrewTalk website. 2019. Accessed October 2020.
- ↑ a b Understanding and operating your new reverse osmosis system (premium series RO system instructions). Buckeye Hydro website. Accessed October 2020.
- ↑ Letting RO water sit. HomeBrewTalk website. October 2020. Accessed October 30, 2020.
- ↑ RO systems cost effective? HomeBrewTalk website. 2019–2020. Accessed October 2020.
- ↑ Woodard J. What is a reverse osmosis tank and how does it work? Fresh Water Systems website. October 2019. Accessed October 2020.
- ↑ a b c Manual for operation & maintenance of L Series reverse osmosis systems. Applied Membranes Inc. Accessed October 2020.
- ↑ Becker N. Homeowners clinic. Popular Mechanics website. November 2006. Accessed October 2020.
- ↑ Residential water pressure explained. Plumbing Supply website. March 2017. Accessed October 2020.
- ↑ RO water filter? HomeBrewTalk website. 2018. Accessed October 2020.
- ↑ Freeman L. How to maintain your RO system for best performance. ESP Water Products website. 2015. Accessed 2020.
- ↑ Gilbert C. Avoiding testing errors: protecting RO membranes from chlorine damage. WaterWorld website. March 2009. Accessed October 2020.
- ↑ Insta-Test free & total chlorine & chloramine strips (fresh water) - LaMotte. Bulk Reef Supply website. Accessed October 2020.
- ↑ a b Flemming HC. Reverse osmosis membrane biofouling. Exp Therm Fluid Sci. 1997;14(4):382–391.
- ↑ Flush valves for RO systems. Marine Depot website. Accessed 2020.
- ↑ Reverse osmosis membrane flush valve. Bulk Reef Supply website. Accessed 2020.
- ↑ How reverse osmosis flush valves work. Pure Water Gazette How It Works Series website. Accessed 2020.
- ↑ Reverse osmosis user's manual. Pure Water Products. 2012.
- ↑ RO membrane flush valve (John Guest/Mur-Lok Fittings). Jett Water Systems website. Accessed 2020.
- ↑ Reverse osmosis system | Installation, operation, and maintenance manual. Conair. 2018.
- ↑ Reverse osmosis membrane flush kit. HydroLogic website. Accessed 2020.
- ↑ Reverse osmosis equipment advice. HomeBrewTalk website. 2017. Accessed October 2020.
- ↑ a b Woodard J. How to sanitize your water filtration systems after a shutdown. Fresh Water Systems website. May 2020. Accessed October 2020.
- ↑ Reverse osmosis user's manual. Hellenbrand. 2012.
- ↑ How to sanitize a reverse osmosis (RO) system. ESP Water Products website. Accessed October 2020.
- ↑ Fitzgerald G. How to sanitize a reverse osmosis system + RO tank cleaning guide. BOS website. August 2020. Accessed October 2020.
- ↑ Cleaning of a RO system. Lenntech website. Accessed October 2020.
- ↑ Wilbert MC, Leib F, Abart E, Boegli B, Linton K. The desalting and water treatment membrane manual: A guide to membranes for municipal water treatment (2nd edition). U.S. Department of the Interior. July 1998.